 Sharon Vaknin/CNET
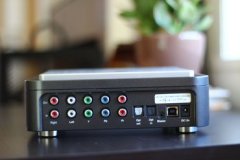
Step 1: Hardware setup
To get started, you'll probably want to find a permanent spot for the PVR in your media cabinet. There are many video cables to connect, and connecting/disconnecting them each time you want to record TV would be hassle.
- Connect the HD PVR to an outlet
- Plug the component video and audio cables from the Video-out section of your cable box to the Video-in section of the Hauppauge HD PVR.
- Finally, connect the USB cable from the PVR to your computer.
Before you continue, install the HD PVR Windows driver and the Total Media Extreme recording program, which can be found on the provided CD. Note that this software is only compatible with Windows. If you're on a Mac, you'll need to purchase additional software here.
Step 2: Configure the recording software
With Total Media Extreme installed, and all the appropriate cables plugged in, you're ready to start recording live TV. All the recording is done in Total Media Extreme, and the files are saved to the desktop location of your choice.
Launch Total Media Extreme and click "Record TV." In most cases, you'll see your TV's feed show up in the video preview box right away. But, before you start recording, tweak these settings in the left sidebar.
- Video Input: YPrPb
- Audio Input: S/PDIF
- PC Audio Mode: 2 Channel Stereo
- Format Settings. Click this and look at the bit rate slider. This will determine the quality of your recordings. A low bit rate produces a fuzzier video of a smaller file size, and a high bit rate will produce a high-def video of a large file size. A good middle ground is 7Mbps; you'll get clear video quality without hogging too much storage space.
- Recording format. You have three options: MTS, TS, or MP4. If you plan to burn the recording to Blu-ray, choose TS. Otherwise, choose MP4.
 Step 3: Start recording
Whew, you're almost there! The good news is, once you have all the hardware and software components configured, you'll rarely have to tweak them. Now it's time to record some live TV.
At the bottom of Total Media Extreme, you'll see a field titled "Save to..." Use this to determine where the final rendered video is saved. Above that, you'll see a Capture button and "Capture duration." If you only want to record for a specified duration, enter it in that box, which is formatted in HH:MM:SS.
Finally, hit "Capture" to start recording.
Once you have these basics down, explore the HD PVR's advanced features, like scheduled recordings and burning Blu-rays. More information can be found in the provided quick install guide, here.
If you do plan to make recording gameplay or live TV a habit, consider purchasing a dedicated external hard drive. These recordings, especially if configured with a high bit rate, will quickly eat up your hard drive's storage space.
|
FreeAir.tv: Live TV anywhere. Simply choose your TV service, tune in, record and watch whenever. Connect your CloudAntenna - the best OTA DVR and Cloud DVR. Mobile Application (FreeAir.tv Inc)
|


